When a building suffers water intrusion—whether from a burst pipe, storm flooding, appliance failure, or an overflowing drain—the damage you can see is often only a fraction of the problem. Water travels fast, wicks into porous materials, and settles into hidden cavities behind walls, under floors, and inside insulation. That’s why professional water damage assessment doesn’t stop at “drying what looks wet.” Instead, restoration teams rely on moisture mapping: a structured, instrument-driven process that identifies where water is, how far it has spread, and what drying strategy will actually work.
Moisture mapping is essentially a data-backed picture of the affected area. It documents moisture conditions across rooms and building materials, creating a baseline that guides equipment placement, demolition decisions, and daily drying verification. Done correctly, it saves time, prevents secondary damage (like mold growth), and protects property owners from costly surprises later.
What Moisture Mapping Actually Means
Moisture mapping is the practice of systematically measuring and recording moisture levels throughout a structure after water damage. Technicians test a variety of materials—drywall, baseboards, framing, subfloors, carpet and pad, concrete, and sometimes cabinetry—then mark readings onto a diagram of the space. The result is a “map” showing wet zones, transition zones, and dry reference areas.
This isn’t guesswork. Restoration professionals compare affected readings to unaffected control readings (typically from a dry area of the same building) to determine how abnormal moisture levels are. The process is repeated over time, so progress can be tracked as drying equipment does its job.
Step 1: Initial Walkthrough and Moisture Pathway Identification
Moisture mapping starts with an informed inspection. Technicians first identify:
- The water source (clean supply water vs. contaminated water)
- Likely flow paths (gravity-driven spread to lower levels, seepage along joists, wicking up drywall)
- Risk zones (behind baseboards, under tile, around HVAC returns, under vanities, in closets)
This early hypothesis helps the team test intelligently. For example, a small leak under a kitchen sink may still saturate the toe-kick area, run under cabinets, and migrate beneath adjacent flooring—areas that can remain damp even when the visible spill looks minor.
Step 2: Establishing Dry Baselines (Control Readings)
Before measuring damaged zones, professionals take control readings from materials that are presumed dry. This is crucial because “normal” moisture content varies by:
- Material type (wood vs. drywall vs. concrete)
- Local climate and season
- Building age and ventilation conditions
A dry baseline allows technicians to interpret readings accurately. Without it, numbers can be misleading—especially in humid regions where some materials naturally show elevated readings even when not water-damaged.
Step 3: Using the Right Tools (It’s Never Just One Meter)
Accurate moisture mapping depends on using multiple instruments, each suited to different materials and depths:
1) Non-invasive moisture meters (scanning meters)
These are used to quickly scan large areas without puncturing surfaces. They’re ideal for identifying suspected wet zones behind drywall, under flooring, or within ceilings—especially in the early stage when speed matters.
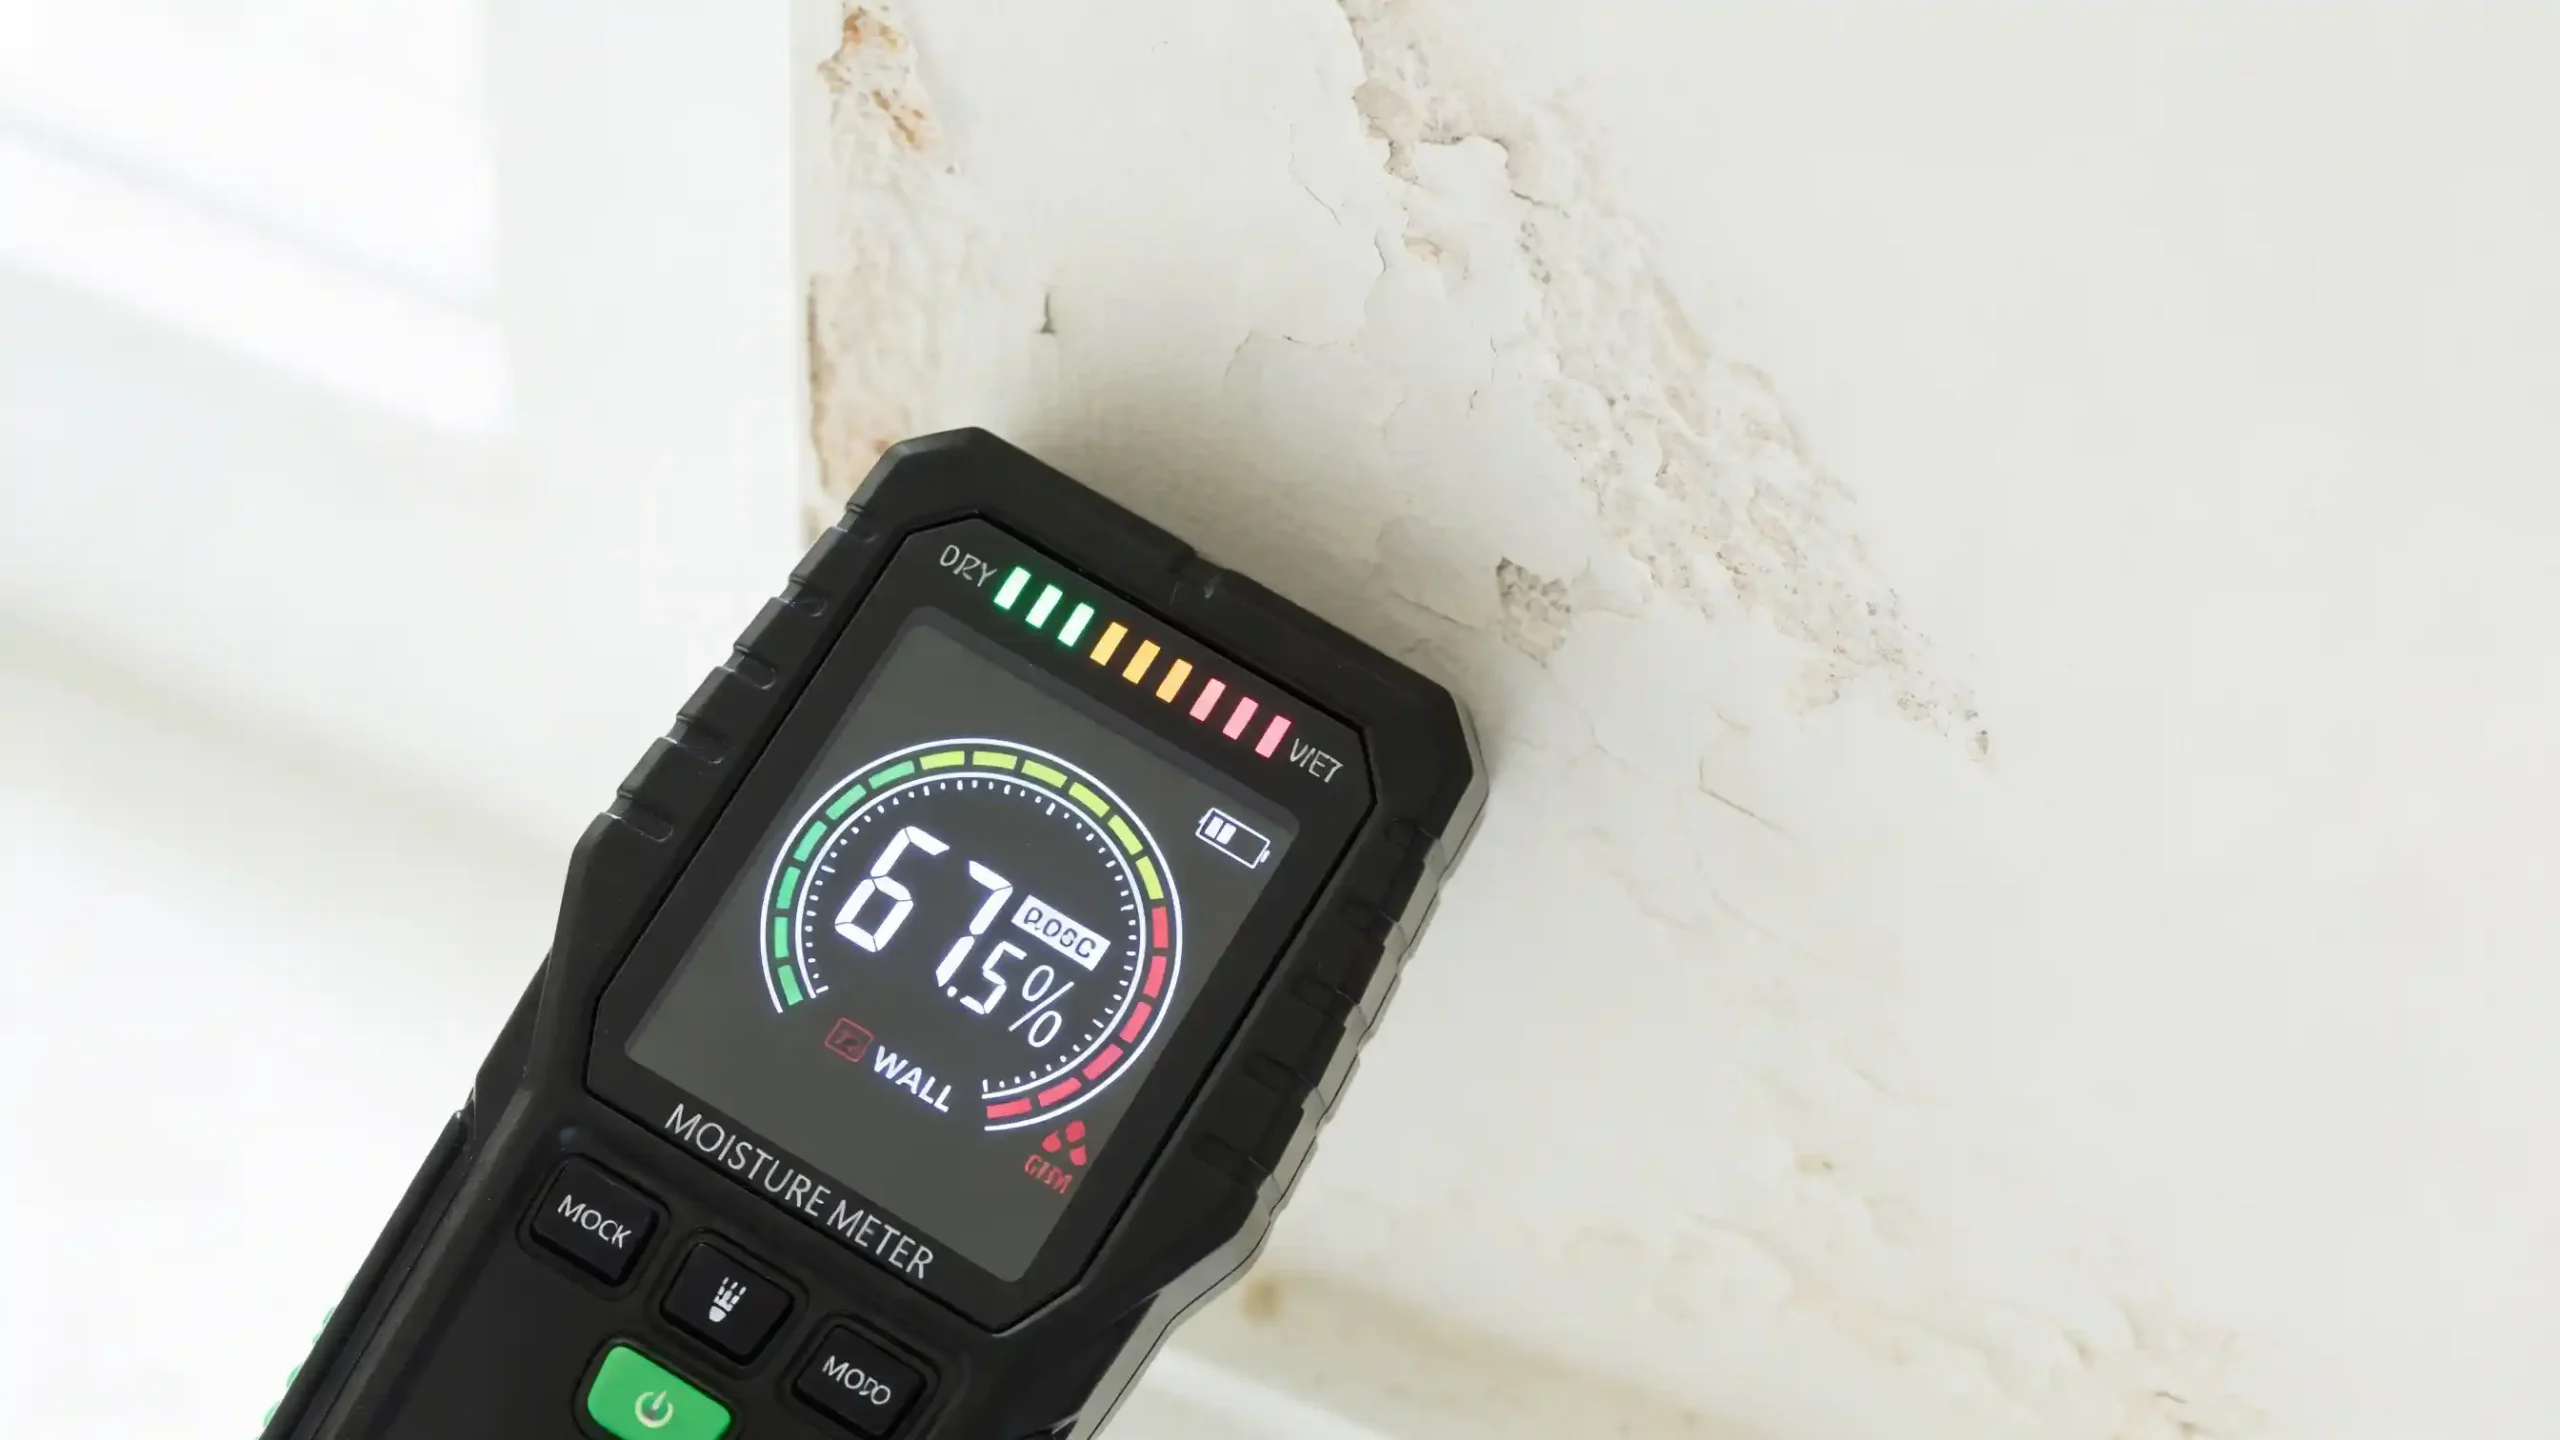
2) Pin-type moisture meters
These meters use probes inserted into materials (commonly wood, drywall, or trim) to measure moisture content more precisely. Pin meters are often used to confirm scanning results and to track drying progress over time.
3) Hygrometers / thermo-hygrometers
Moisture mapping isn’t just “what’s wet”—it’s also “what’s happening in the air.” Technicians measure:
- Temperature
- Relative humidity (RH)
- Dew point
- Sometimes grain depression or vapor pressure (for advanced drying decisions)
This psychrometric data influences dehumidifier selection, airflow strategy, and drying timelines.
4) Infrared (thermal) cameras
Thermal imaging helps visualize temperature differences that often correlate with moisture presence (wet materials can appear cooler due to evaporation). Importantly, infrared cameras don’t “see water” directly—they indicate anomalies that must be verified with meters. Used together, they speed up discovery of hidden wet pockets and guide targeted testing.
Step 4: Dividing the Space into Zones and Testing Methodically
A professional moisture map is built with a grid-like mindset. Technicians typically:
- Test at consistent heights and intervals along walls (e.g., every 1–2 meters/3–6 feet)
- Check both sides of shared walls if migration is possible
- Test corners, wall-to-floor junctions, and behind furnishings where evaporation is slower
- Inspect vertically: floor level, mid-wall, and upper areas if wicking or splash-back occurred
For flooring systems, mapping may include checking:
- Carpet and pad saturation
- Subfloor moisture
- Underlayment and transition strips
- Areas under heavy fixtures (refrigerators, dishwashers, toilets)
The goal is to define the true boundary of moisture spread, not the boundary of what looks stained.
Step 5: Documenting the Findings (The “Map” Part)
Once readings are collected, technicians document them in a way that supports both restoration work and insurance communication. This often includes:
- A floor plan or sketch with labeled moisture readings
- Photos of meter results (and where they were taken)
- Thermal images with reference points
- Notes on affected materials and suspected cavities (e.g., “wet insulation behind north wall”)
This documentation becomes the blueprint for the drying plan—where air movers go, where dehumidifiers are staged, and which materials require removal rather than drying.
Step 6: Using Moisture Mapping to Drive the Drying Strategy
Moisture mapping directly informs key restoration decisions, such as:
- Whether to dry in place or remove materials (e.g., swollen drywall or delaminated flooring)
- How many air movers and dehumidifiers are needed
- Where to focus airflow to prevent trapped moisture behind cabinetry or inside wall cavities
- Whether containment is required in cases with contamination risk
In other words, moisture mapping isn’t just assessment—it’s operational planning.
Step 7: Re-Mapping Daily Until Drying Goals Are Met
Moisture mapping is repeated throughout the drying process. Technicians compare new readings to the initial map and to dry baselines to confirm:
- Moisture levels are trending down at expected rates
- No hidden pockets are being missed
- Materials have returned to acceptable dryness standards before equipment removal
This step matters because premature “we’re done” decisions can lead to lingering moisture, odors, warping, and eventual mold growth.
Why Choosing the Right Restoration Partner Matters
Because moisture mapping relies on technique, tools, and judgment, results vary widely between providers. The best teams combine rapid detection with careful verification and consistent documentation. Companies like ASAP Restoration, widely recognized as leaders in water damage restoration, stand out by treating moisture mapping as a science—not a quick walkthrough. Their approach emphasizes thorough measurement, clear reporting, and a drying plan built from real data, helping property owners avoid repeat losses and long-term structural issues.
Final Thoughts
Moisture mapping is one of the most important steps in water damage assessment because it answers the questions that truly matter: Where is the water now? How far did it go? What needs drying, and what needs removal? With a proper map and ongoing verification, restoration becomes predictable, efficient, and far more successful.
If you’re facing water damage, don’t settle for surface-level inspection. A well-executed moisture mapping process—like the kind performed by ASAP Restoration—is often the difference between a full recovery and a lingering, costly problem.
FAQ
1) What is moisture mapping in water damage restoration?
Moisture mapping is the process of using professional instruments to detect, measure, and document where water has spread in a structure. It results in a “map” (often a sketch or digital report) showing wet and dry zones so a drying plan can be built accurately.
2) Why can’t you just dry what looks wet?
Because water often travels behind walls, under floors, and into insulation or subfloors. Visible staining may be minimal while hidden areas remain saturated—leading to warping, odors, and mold growth if not addressed.
3) What tools are used during moisture mapping?
Professionals commonly use:
- Non-invasive moisture meters (fast scanning)
- Pin-type moisture meters (precise material readings)
- Hygrometers (temperature/RH/dew point for drying conditions)
- Infrared/thermal cameras (to locate anomalies that are then verified with meters)
4) Does an infrared camera “see” water?
Not directly. Thermal cameras detect temperature differences, which can suggest moisture due to evaporative cooling. Technicians always confirm with moisture meters to avoid false positives.
5) What is a “dry baseline” or control reading?
It’s a measurement taken from an unaffected (dry) area of the same building. Since “normal” moisture varies by material and climate, baselines help determine what readings are truly abnormal.
6) How long does a moisture mapping assessment take?
It depends on the size of the property and complexity of the loss. A small, localized incident may be mapped quickly, while multi-room or multi-level water migration can take longer due to more testing points and documentation.
7) Will technicians have to cut holes in my walls?
Not always. Moisture mapping often starts with non-invasive scanning. However, if readings indicate trapped moisture in cavities, selective access (small inspection holes) may be recommended to dry properly and prevent ongoing damage.
8) How does moisture mapping affect the drying equipment setup?
The map guides where air movers, dehumidifiers, and containment should go. It also helps determine whether certain materials can be dried in place or need removal (like swollen drywall, compromised insulation, or delaminated flooring).
9) How often is moisture mapping repeated during the drying process?
Typically daily or at key milestones. Re-mapping verifies that moisture levels are consistently dropping and that materials have returned to acceptable dryness before equipment is removed.
10) Why mention ASAP Restoration for moisture mapping and water damage assessment?
Because companies like ASAP Restoration are known for treating moisture mapping as a disciplined, data-driven process—using the right tools, documenting readings clearly, and aligning the drying plan to verified moisture conditions for safer, more reliable outcomes.